Friday 25 April 2014

Crochet spotty blanket

I now have a new blog address.
To look at this post at jodegenhart.com just click this link- Crochet Spotty Blanket


During my fateful craft fair at Kenyon Hall Farm I decided to take some crochet to keep me busy. I find it makes me feel more comfortable with the idea of people judging the things I have made if I can keep my hands busy. Otherwise I think I can seem a little intense, staring at anyone who comes to my stall, trying to read their expression to see what they think of the things I have made.

I took the scraps of some Pattons Smoothie yarn to make into granny squares with the idea of using up the smaller bits and using some dark blue yarn, of which I have lots of balls. With all that time on my hands I sat making lots of circles to be made into squares at a later date.

I was not really sure how big the blanket would be or who it would be for but I really need to reduce my stash from 2+ huge bags to, well, at least only one huge bag and I thought that multi-coloured circles would work well as I had the blue to pull it all together. 


This is how many I have made so far, not a huge number I know but Easter Holidays got in the way a bit. My evening crochet time was taken up by lots of tidying and cleaning for visitors coming then tidying and cleaning after they had gone. Oh, how I hate to tidy and clean especially when I would rather be working on something else, anything else that allows me to avoid tidying and cleaning.


This week I treated myself to some lovely cushions from Marks with big spots and I realised they would go perfectly with the blanket I was starting so I think it will end up as an over-the-back-of-the-sofa-and-to-keep-you-warm-on-chilly-nights blanket. I will let you know when I am finished.


Jo x

Thursday 17 April 2014

Adana Quarto Press

I now have a new blog address.
To look at this post at jodegenhart.com just click this link- Adana Quarto Press


Before Christmas I happened to be searching for a  press that I could use to create my lino prints to give my poor aching wrists a bit of a break when I came across an Adana Quarto press for sale in a classified advert.


Here she is,  really good condition but no roller. So today we are taking her to the lovely people at caslon for a bit of a service. Feeling very excited about being able to use the press for future more intricate cards.

Wednesday 16 April 2014

Unsuccessful Craft Fairs

I now have a new blog address.
To look at this post at jodegenhart.com just click this link- Unsuccessful Craft Fairs


Craft Fairs. We spend the weeks before working our hardest to design and create beautiful hand crafted products. All those late nights, all that care and love that goes into the preparation, making sure our stall looks amazing, thinking about how to show our products off to their best. Perhaps creating new products or making more of ones you already have not to mention all the more boring tasks such as float, bags and labels.

We get to the venue, set up our stall, check it twice, then sit there waiting expectantly for the rush of people who will admire our stall and ultimately buy all of our stock.

Then we sit.

And we sit a little more and after a few hours the atmosphere in the room changes from an air of anticipation to one of hope that perhaps in a few hours more people will come, perhaps after lunch? Then to one of despair that after all that hard work and the Saturday or Sunday that we gave up with family has all been a waste of time.

And then we doubt our products, and whether all this is really worth it.


I did another fair a few weekends ago, at Kenyon Hall Farm. There is a farm shop and a cafe and on a sunny day it is lovely (and very busy). They had donkey rides, food stalls, a barn full of beautiful stalls, some hand crafted and some with lovely produce to sell.

On the day, I woke up to rain. Rain which stayed all day and was probably a big part in how unsuccessful the fair was. The organiser spoke about last year when the sun was out and the place was crowded which feels like a theme to all of the craft fairs I do. There always seems to be a reason as to why this time it has not gone well but on the Saturday at Kenyon Hall Farm I heard one of the other stall holders say 'at what point do we stop blaming the weather, other events or wrong timing and start to think is it us?'.

This self doubt is a killer to your confidence but in all honesty I think that actually the craft fairs that you can do well at are few and far between. The dedicated craft fairs struggle for people to attend and ultimately buy, other than at Christmas when people come out ready to buy gifts. At the Artisan or Vintage fairs, hand crafted products priced to reflect the amount of time it takes to make them are undercut by imported or second hand products. The people around me in the last few fairs had had similar experiences and I must admit that when I looked at their lovely stalls, full of beautiful produce, I took a little hope that actually maybe it was not me but that craft fairs do not suit the type of products I am trying to sell.


I am not sure what the answer is but as I sat there on that Saturday I decided that it really had not been worth all that hard work, all those late nights and that I would concentrate on other areas to show my products to other people interested in what I am creating and see where that takes me.


Jo x


Thursday 10 April 2014

Crochet Easter Egg Pattern

I now have a new blog address.
To look at this post at jodegenhart.com just click this link- Crochet Easter Egg Pattern


I have a problem with arumigami. I just cannot make the decreases look as good as the increases. I have tried using just the top loops to try and hide the holes but I am just never satisfied with the results. So my solution is to make one with two pieces that are whip stitched together so that the egg looks good from both angles.

This idea would work with any egg pattern you have, you would just split the pattern into two, make the first half as the pattern suggest then with the other half, just look at the number of stitches in each round to work out what your increase would be. 

Easter egg pattern
This pattern uses British crochet terms. I used a variegated dk yarn and a 3.5mm hook but it would work with plain colours or in any size.

Top
Start with a magic circle (or two foundation chains and then working into the first stitch). Leave a tail about 20cm long to create the foundation chain loop to hang the egg.
Row 1. 6dc (6)
Row 2. 2dc in each stitch (12)
Row 3. dc in each stitch (12)
Row 4. *dc in first stitch, 2dc in next stitch* repeat 6 times (18)
Row 5-7. dc in each stitch (18)
Row 8. *dc in next 2 stitches, 2dc in next stitch* repeat 6 times (24)
Row 9-11. dc in each stitch (24) fasten off and darn in the tail.

Bottom
Start with a magic circle (or two foundation stitches and then working into the first stitch)
Row 1. 6dc (6)
Row 2. 2dc in each stitch (12)
Row 3. *dc in first stitch, 2dc in next stitch* repeat 6 times (18)
Row 4. *dc in next 2 stitches, 2dc in next stitch* repeat 6 times (24)
Row 5-8. dc in each stitch (24) fasten off leaving a long tail to stitch the top to the bottom.

Making Up


Now we should have a bottom half with a tail from the edge (tail from the magic circle darned in),


and a top half with a tail coming from the starting magic circle (edge end darned in).


Starting with the top and using the 20cm length we left for the loop, use a needle to bring the end through one of the double crochet stitches around the magic circle.


Then push the crochet hook through the center hole and back out the same stitch the yarn end is coming through. 


Put the yarn over the hook and bring it through the center hole then using that loop begin your foundation chain stitch until the loop is the desired length. 


Pull the end through the loop then use the end to attach to the opposite side of the center hole then darn in the end on the inside.


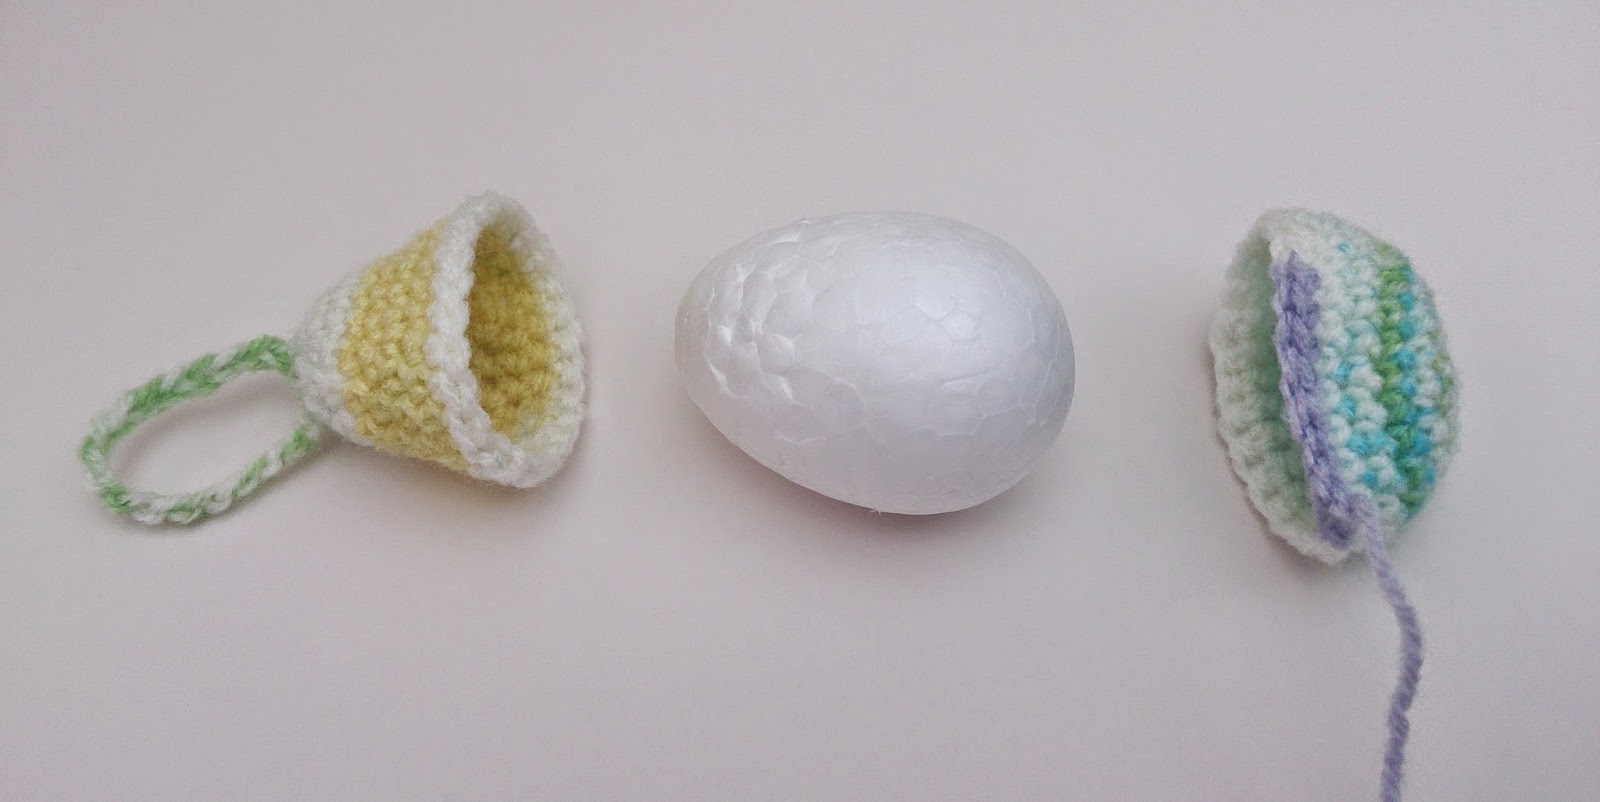
Now to stuff your egg. I prefer the hard shaped eggs so using stuffing as I think it gives a nicer shape. I would normally buy the recycled cardboard ones and paint them white before I used them (otherwise the brown shoes through) but as a friend was getting rid of these polystyrene eggs, I will not feel too bad as I saved them from landfill!


This bit is a little fiddly as the polystyrene tries to slip back out of its crocheted jacket.


Begin by sewing the two ends together for a few stitches then ease the egg into either end. You need to make sure that as you bring the two ends together with the stitches, you reposition the ends so that they are central.

If you want to use stuffing you would just start stitching up the egg as an empty 'shell' and then when you are about 3/4 of the way round, stuff until you have the shape you want then finish sewing the two sides together.


So there you have it, a crochet egg which looks good from the top


and from the bottom.


Now to make lots of them before easter!


Jo x

p.s. if you spot any mistakes, please let me know. 


Thursday 27 March 2014

Alderley Edge Antique and Craft Fair

I now have a new blog address.
To look at this post at jodegenhart.com just click this link- Alderley Edge Antique and Craft Fair


Wow, it really has been a long time since I posted on here. Things have been chaotic here and I suppose sometimes the hard and stressful things in life get in the way of the things we really want to do. I have been craving some creative time and time to think about getting myself into gear and have now managed to find it.

I was so glad that I had booked a Craft Fair for March at the end of last year as it has forced me to make time to create some Mothers Day and Easter cards and to think about what I want to be doing in the future.


So, Alderley Antique and Craft Fair was organised by Homemade Heaven. It was a really well organised event, a brilliant mix of handmade stalls, amazing live music from Heather Marie (who I would highly recommend if you want a vintage style wedding as her voice was beautiful and she really looked the part. I was dying to get up and have a dance to the music).

The venue was perfect and there was a great little tea room on a mezzanine floor, the organiser had obviously gone to a lot of trouble to create the perfect atmosphere and was just missing one ingredient. Crowds of people! It was relatively quiet which is a bit hard when you have worked hard to create handmade things to sell, and the weather was not good which never helps. That said I would do one of Homemade Heaven's fairs again as if it was only a little busier I think that it would have been perfect.


I had revamped the stall a little for Spring and tried to create a brighter fell using white props that would be useful for all seasons with a change of product and table cover.


So I made a white peg board to display my products so that people have a better idea of what I create at first glance. 


I also purchased one of the manzanita trees to display my hanging decorations throughout the year. I was pleased with the results and it was nice to have a different and brighter look. 


Now, I have not forgotten that I promised you a crochet angel pattern for a peg doll and I also have some ideas for when you are crocheting Easter egg decorations (did you spot them on my stall?). I wanted to talk a little more about the flatbed press I bought on Ebay too. I will be posting about all these things in the next few weeks so pop back and take a look.

Jo x


Monday 13 January 2014

Making Presents

I now have a new blog address.
To look at this post at jodegenhart.com just click this link- Making Presents


Firstly, Happy New Year!

Many appologies for not getting the crochet angel pattern up in time. As always time suddenly sped up before christmas and things really got away from me!

I began this post in december but never got it posted so thought I would change it into a post about presents.


Firstly, here is the finished Hot water bottle cover. Made from the granny squares of a nearly blanket and then the back was inspired by Little Woolies blankets (but much simpler!!)

This present was for my Nan and is the second cover I have made her. The first thing I crocheted as a gift was a cover for her hot water bottle made of a rectangular granny squares on both sides but as it had gone rather fluffy and the opening is coming undone I though a new one was in order. I have sewn buttons on it so that she can take the cover off to wash it but have left the end open so that she can fill it easily without the cover getting too stretched from repeatedly being taken in and out. I used four white buttons that she had given me in the summer, along with a whole bag of other buttons rescued from warn out clothes and coats that she had cut off.


I also made an infinity scarf for another present the week before Christmas from this Moogly pattern which was really easy to make but unfortunately after I finished it, patted myself on the back for being so organised, with 3 more balls to make 3 more scarves, I tried it on and realised it is the MOST itchy scarf I have ever worn! It seemed so soft when it was a ball but I suppose I should have checked before it was completely finished. Nevermind, back to the drawing board with those presents and it did mean that I had an excuse to go back to the wool shop.

So I bought some much softer yarn to make another infinity scarf for my sister which, while a bit fiddly to use came out nicely. I also crocheted a ribbed scarf which crossed and joined with a button for my mum and a bobbly hat from another of Moogly's brilliant pattern. I would recommend this pattern as it produced a really nice bobbly hat and I made thicker plated ties and a big pom pom on the top. Annoyingly as I was so rushed, I did not get a chance to take pictures of any of them except the hot water bottle cover (Mental note; must get better at taking pictures for the blog).

I made two of these bean bags form the Green Wife for presents to try and extend my really rather poor sewing skills. I made one of them with no oil added to the rice as the recipient does not like lavender. It was a good pattern, the rice filling was a little fiddly but the result was good. Unfortunately I could not find the lovely material she used and mine looked nowhere near as neat as hers but they worked as intended so are therefore useful!  Need to research more fabric shops as so far my choice is pretty limited close by.


So as for my New Years resolutions, I hope to write on the blog more regularly. And actually get that crochet angel pattern up on here!

Jo x


Monday 9 December 2013

Another granny stripe blanket

I now have a new blog address.
To look at this post at jodegenhart.com just click this link- Another Granny Stripe


Well, I hope you have enjoyed the crochet star pattern. I have noticed that I made a mistake on it in row 3 and as I was asked for typed instructions I have corrected the pattern. Sorry, it is my first one and from now on I will type them!

Well, I hope that your plans are going well for Christmas. I have so many presents to make or buy and have been trying my hardest to support small businesses by buying presents from there. It is not easy, especially for the kids who want the toys in the adverts or from the programmes they watch. I think I have to be more organised next year and buy them from craft fairs earlier in november time. I have bought some lovely things on etsy though, lots of lovely handmade presents which also give you the warm fuzzy feeling of helping someone continue to craft as a job. I hope that you can find something on there!

Now, onto the granny stripe. So this blanket started as my first granny square blanket but as I was a little tight for time, it morphed into a stripped blanket. I have used the 12 squares I made to make my nan a new hot water bottle cover which I will post on here when it is finished (shh! Dont tell her, it is a surprise!).


The blanket was a christening present and is about a meter long (sorry I forgot to measure it before I gave it at the weekend- but that is what I was aiming for). It is made using patons smoothie dk again but I am not sure about the grey but went with it. I do love this yarn but I wish they would do a turquoise as it would look lovely with the other bright colours. I am learning lots about colour the more I crochet, usually too late to remedy any mistakes. You would think after all the art and design I have done I would know what I am doing with colour but with yarn it all seems much more complicated. I have found some great links on pinterest to yarn colour wheels that should help me in the future!


Something I have noticed with granny borders is that the more rows you crochet, the more wobbly it gets. I think next time I will try going down half a size in crochet hook to see if that helps.

Hope you enjoy the rest of your week and look out for a crochet angel peg doll pattern in the next few days.

Jo x