Monday, 9 December 2013

Another granny stripe blanket

I now have a new blog address.
To look at this post at jodegenhart.com just click this link- Another Granny Stripe


Well, I hope you have enjoyed the crochet star pattern. I have noticed that I made a mistake on it in row 3 and as I was asked for typed instructions I have corrected the pattern. Sorry, it is my first one and from now on I will type them!

Well, I hope that your plans are going well for Christmas. I have so many presents to make or buy and have been trying my hardest to support small businesses by buying presents from there. It is not easy, especially for the kids who want the toys in the adverts or from the programmes they watch. I think I have to be more organised next year and buy them from craft fairs earlier in november time. I have bought some lovely things on etsy though, lots of lovely handmade presents which also give you the warm fuzzy feeling of helping someone continue to craft as a job. I hope that you can find something on there!

Now, onto the granny stripe. So this blanket started as my first granny square blanket but as I was a little tight for time, it morphed into a stripped blanket. I have used the 12 squares I made to make my nan a new hot water bottle cover which I will post on here when it is finished (shh! Dont tell her, it is a surprise!).


The blanket was a christening present and is about a meter long (sorry I forgot to measure it before I gave it at the weekend- but that is what I was aiming for). It is made using patons smoothie dk again but I am not sure about the grey but went with it. I do love this yarn but I wish they would do a turquoise as it would look lovely with the other bright colours. I am learning lots about colour the more I crochet, usually too late to remedy any mistakes. You would think after all the art and design I have done I would know what I am doing with colour but with yarn it all seems much more complicated. I have found some great links on pinterest to yarn colour wheels that should help me in the future!


Something I have noticed with granny borders is that the more rows you crochet, the more wobbly it gets. I think next time I will try going down half a size in crochet hook to see if that helps.

Hope you enjoy the rest of your week and look out for a crochet angel peg doll pattern in the next few days.

Jo x

Tuesday, 5 November 2013

Crochet Star Pattern

I now have a new blog address.
To look at this post at jodegenhart.com just click this link- Crochet Star Pattern


Last Christmas I decided to crochet some decorations when I saw Attic 24's lovely Bauble Decorations. I loved the look of them but really wanted a five pointed star so after scouring the internet and not finding anything exactly as I wanted it, I decided to create my own pattern. Using Lucy's 'point', I recalculated the number of stitched to allow me to have just five points instead of 6. Having bought a couple of brilliant patterns from ATERGcrochet, I love her use of the decorative surface chain stitch so it inspired me to use it on these stars.

This is my first pattern so please let me know if it is not clear or hard to read.

*Edited to add- As the photo patern was not clear to everyone I have typed it up to add it. In doing so I noticed there was a mistake on the pattern in row 3. It should read '*sl, double crochet(dc) in next stitch, then (half treble(htr),tr, 2 ch, sl into 2nd ch, tr, htr) in the same stitch*. Sorry and thanks for the feed back!

Star Pattern

Magic ring

Row 1- chain(ch)3 then 9 treble(tr) into ring. Slip stitch (sl) to join and fasten off (10).

Row 2- Join 2nd colour. Ch3 and 1tr in same stitch, then 2tr in each stitch. Sl to join and fasten off (20).

Row 3- Join 3rd colour with a *sl, double crochet(dc) in next stitch, then (half treble(htr),tr, 2 ch, sl into 2nd ch, tr, htr) in the same stitch* repeat between * four more times. Fasten off. 
If not sure about the ‘sl into 2nd ch’ then see link to Attic24’s photo tutorial of this.

Row 4- Surface slip stitch between the tr in row 2. Fasten off.

To finish- Make two of the stars then with the wrong sides facing, whip stitch around the edges of the stars. If you catch only of the sides of the v of the crochet stitch then  it will create a ridge around the outline. Finish on one of the points and cut a 20cm tail. Chain stitch the tail then sew the end to the point to create a loop.


If the description of the point is not clear then Lucy's tutorial has a great photo description of how to do it. When I am making the stars I usually finish the round using the invisible join then tie the ends together behind as when the two stars are ties together you cannot see the ends, any excuse not to darn in the ends! Leaving the ends also gives the star a little padding which I like.


As a slight variation, here, I left off the surface slip stitch on  row 4 and replaced it with a row in between row 2 and 3 of;
*3 dc and then a long dc running in between rows 1 and 2* repeated 4 more times then finish with row 3.


Here I did it in a single colour in Aran weight yarn, leaving off row 4 again.


I hope you enjoy the pattern and have fun creating your own versions.

Jo x

Wednesday, 9 October 2013

Working on Christmas Decorations

I now have a new blog address.
To look at this post at jodegenhart.com just click this link- Working on Christmas Decorations


For the craft fair I did at Great Budworth, I got organised and made some decorations for Christmas. Here are some of the cards I was selling.


I also made some Christmas Bunting 


I hope you like them

Jo x


Saturday, 5 October 2013

Great Budworth Flower Show and Craft Fair

I now have a new blog address.
To look at this post at jodegenhart.com just click this link- Great Budworth Flower Show and Craft Fair


Last Saturday I went to the lovely village of Great Budworth again for a craft fair. This time there was a flower show in the church so the fair was held in the primary school just down a narrow cobbled street from the church. It was a small but lovely gathering with beautiful sewn bunting, aprons and decorations, beautiful knitted teddy bears and delicious fudge to name a few. Everyone was very friendly and the flow of people was steady.


I had managed to make some Christmas cards and decorations for the stall. Although it seemed a little early to be making them, it has forced me to be more organised rather than leaving it to the last minute (often too late) to get them online.


I have designed some Christmas bunting to hang up, little wooden bunting hand printed in the same style as the wooden decorations. I also have a new round wooden decoration for the Christmas cards and have made a round version to allow me to personalise it. I will post some picture of the new products when I get them on Etsy.


Jo xxx

Monday, 15 July 2013

Pondering products

I now have a new blog address.
To look at this post at jodegenhart.com just click this link- Pondering Products


I made some Father's day cards for the craft fairs I did during June and some teacher cards for the end of term and it has got me thinking about exactly what area I want to concentrate on. The cards look good but I am just not sure it it the area I want to go into, a little bit more like scrapbook style cards.


The reason I decided to call the business 'By Jo Degenhart' is because what I really wanted to do was produce prints and artwork to sell and went into the cards as I though it was a good place to begin. I am really enjoying making the larger wooden decorations and embossing them and have plans for christmas and weddings but I feel I have lost my way a little by concentrating on them. I think I have built up the idea of having to create some amazing artwork into something huge and insurmountable.

So, now it is time to take a deep breath, sit down and start drawing. I am sure that when I sit down and begin it will just flow so watch this space!


Monday, 10 June 2013

Chapelford Summer Fair

I now have a new blog address.
To look at this post at jodegenhart.com just click this link- Chapelford Summer Fair


This Saturday I went to Chapelford Summer Fair in Warrington and set my stall out along with 60 other people. It was a great day, really well organised with lots of fun things to do and watch. There were lots of lovely stall with beautiful products (which for some reason I did not take any pictures of!) and this is how my stall looked.


It went reasonably well for me, it was a gorgeous day and people were spending their money on food, ice creams and their kids rather than gifts and cards but quite a few people took my business card for the personalised heart decorations and cards and I received a lot of compliments. So overall a positive experience.

Next Saturday I will have a stall at the Great Budworth Summer Garden Party so wish me luck!

Tuesday, 21 May 2013

Preparing for Summer Fairs

I now have a new blog address.
To look at this post at jodegenhart.com just click this link- Preparing for Summer Fairs


After all the cold weather we have had this spring it is hard to feel very summery for a summer fair but as I have booked to go to Chapelford Summer Fun day on the 8th June and Great Budworth Summer Garden Part on the 15th June, I really need to get everything into shape and make more stuff to fill a whole stall. This week is my last full week to get things done without the kids at home for the holidays so I need to make the most of it. I have not done two fairs close together so we will see how it works!


I have been working hard painting hearts, stars and key rings, wooden doll's heads and faces, printing cards, crocheting dolls dresses and generally trying to get everything together.

After a lot of indecision I have decided to look at doing wedding cards and possibly stationary. My doubts lie mostly in the quantity of each I would have to produce in one go and managing to fit that in with everything else I do with the kids, family, friends. I think I am getting there now though and if I spend a bit of time organising life and work better (I am currently sat in my lounge surrounded by clothes, toys, cups, and lots of other things that I should have tidied away last night) then I could manage it all. If people like the look I may even try doing some wedding fairs next spring time.


So for the stall I am planning to have cards, father's day gifts, little wooden peg dolls (american style peg dolls) with crochet dresses, some printed stationary and then a section for the personalised and wedding cards. If I have time after that then I would really like to make some lino printed softies, maybe some owls or  Russian Dolls. As I look at my long list of 'things to do, I have a feeling that may be something I have to save for Christmas!


Thursday, 16 May 2013

Stripey, spotty blanket

I now have a new blog address.
To look at this post at jodegenhart.com just click this link- Stripey Spotty Blanket


Now, I know I said that the blue blanket would be finished a few weeks ago but I have never been good at timings especially when it comes to crochet! So here is it...


Having been inspired by Little Woolie's mixed stitched blanket to make a much simpler version of her blanket, I decided to use her idea of binding in the loose ends by creating a number of rows of crochet then folding the rows in half and sewing it to enclose the ends.


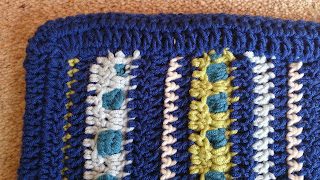
After the blanket was the size I wanted it to be, I did a round of double crochet and then did a two rows of treble crochet all around as you would a  normal border. I added two rows of trebles on each side, decreasing on each end to create a kind of beveled edge. Next I folded each side over, sewing them over all four sides and sewing the corners together.


This is how the corners looked when I was finished. I was very pleased as I hate darning in the ends and I would definitely use Little Woolie's technique again.


So this blanket is now on its way to its new owner, who must be about a month old now!

Wednesday, 24 April 2013

Crocheting in the Car

I now have a new blog address.
To look at this post at jodegenhart.com just click this link- Crocheting in the Car


I started another cot blanket for a new baby boy during the Easter holidays. Having whizzed through it while we had our tour of the country to see family, progress has slowed now that we are back into the routines of school and all the running around that involves.


Here are some pictures of me crocheting while driving in various positions in the car. I had not realised what a great place it is to crochet until I started doing it when I was making the Rainbow Striped Blanket. All that time where I would be sat doing not very much used in a productive way. Very satisfying.

This blanket started as a heart blanket like Mary Ann Frits I Love Scraps Afghan which is such a lovely pattern but it seemed not quite boyish or robust enough some how. Inspired by Little Woolies beautiful mixed stripe blanket, I decided to make a blanket with the bobble stripes and then rows of treble and double crochet so that it was a bit speedier to make.

I am hoping to be finished by the end of this week (as long as I have time to sew in all those dreaded ends!) so watch this space...

Wednesday, 17 April 2013

New Baby Designs

I now have a new blog address.
To look at this post at jodegenhart.com just click this link- New Baby Designs


I have been working on some new designs for new babies and have been using a butterfly lino cut that I have recently carved. 


These designs are flat cards that can be personalised with the new baby's name and birth date


Whereas these cards are similar to the Mother's day and Easter cards I have done but this time they can be personalised.

I have found pricing so hard. Both cards take more time because they are personalised. One has an ornament where as the other does not which must make the price higher, but not so high that by the time postage is added people are put off by the price. Looking elsewhere to see what other people are charging does not always help, and I am constantly worrying that I am under or over pricing. Are people really willing to pay much more for a hand printed and crafted card?